
%22%20fill=%22%233DB8EA%22%3E%3C/path%3E%3C/svg%3E%20)
%22%20fill=%22%233db8ea%22%3E%3C/path%3E%3C/svg%3E%20)

%22%20fill=%22%233db8ea%22%3E%3C/path%3E%3C/svg%3E%20)
%22%20fill=%22%233db8ea%22%3E%3C/path%3E%3C/svg%3E%20)
%22%3E%3Cg%20id=%22Group_107%22%20data-name=%22Group%20107%22%20transform=%22translate(692.5%20-193)%22%3E%3Cpath%20id=%22Path_81%22%20data-name=%22Path%2081%22%20d=%22M712.438-153.124A19.96,19.96,0,0,1,692.5-173.062,19.96,19.96,0,0,1,712.438-193a19.96,19.96,0,0,1,19.938,19.938A19.96,19.96,0,0,1,712.438-153.124Zm0-38.063a18.146,18.146,0,0,0-18.125,18.125,18.146,18.146,0,0,0,18.125,18.125,18.146,18.146,0,0,0,18.125-18.125A18.146,18.146,0,0,0,712.438-191.187Z%22%20transform=%22translate(-692.5%20193)%22%20fill=%22%233CB7E9%22%3E%3C/path%3E%3C/g%3E%3Cg%20id=%22Group_108%22%20data-name=%22Group%20108%22%20transform=%22translate(709.58%20-175.92)%22%3E%3Cpath%20id=%22Path_82%22%20data-name=%22Path%2082%22%20d=%22M817.858-64.784A2.861,2.861,0,0,1,815-67.642a2.861,2.861,0,0,1,2.858-2.858,2.861,2.861,0,0,1,2.858,2.858A2.861,2.861,0,0,1,817.858-64.784Zm0-3.9a1.047,1.047,0,0,0-1.046,1.046,1.047,1.047,0,0,0,1.046,1.046,1.047,1.047,0,0,0,1.046-1.046A1.047,1.047,0,0,0,817.858-68.687Z%22%20transform=%22translate(-815%2070.5)%22%20fill=%22%233CB7E9%22%3E%3C/path%3E%3C/g%3E%3Cg%20id=%22Group_111%22%20data-name=%22Group%20111%22%20transform=%22translate(708.919%20-188.817)%22%3E%3Cg%20id=%22Group_109%22%20data-name=%22Group%20109%22%20transform=%22translate(0%206.669)%22%3E%3Cpath%20id=%22Path_83%22%20data-name=%22Path%2083%22%20d=%22M814.005-110.519a.9.9,0,0,1-.641-.265l-2.835-2.835a.906.906,0,0,1,0-1.282.906.906,0,0,1,1.282,0l2.194,2.194L816.2-114.9a.906.906,0,0,1,1.282,0,.906.906,0,0,1,0,1.282l-2.835,2.835A.9.9,0,0,1,814.005-110.519Z%22%20transform=%22translate(-810.264%20115.167)%22%20fill=%22%233CB7E9%22%3E%3C/path%3E%3C/g%3E%3Cg%20id=%22Group_110%22%20data-name=%22Group%20110%22%20transform=%22translate(2.835%200)%22%3E%3Cpath%20id=%22Path_84%22%20data-name=%22Path%2084%22%20d=%22M831.5-151.683a.906.906,0,0,1-.906-.906v-9.5A.906.906,0,0,1,831.5-163a.906.906,0,0,1,.906.906v9.5A.906.906,0,0,1,831.5-151.683Z%22%20transform=%22translate(-830.598%20163)%22%20fill=%22%233CB7E9%22%3E%3C/path%3E%3C/g%3E%3C/g%3E%3Cg%20id=%22Group_114%22%20data-name=%22Group%20114%22%20transform=%22translate(716.126%20-172.374)%22%3E%3Cg%20id=%22Group_112%22%20data-name=%22Group%20112%22%20transform=%22translate(0%200)%22%3E%3Cpath%20id=%22Path_85%22%20data-name=%22Path%2085%22%20d=%22M864-38.263a.906.906,0,0,1-.868-.648l-1.144-3.843a.906.906,0,0,1,.61-1.127l3.843-1.144a.906.906,0,0,1,1.127.61.906.906,0,0,1-.61,1.127l-2.974.886.886,2.974a.906.906,0,0,1-.61,1.127A.911.911,0,0,1,864-38.263Z%22%20transform=%22translate(-861.954%2045.063)%22%20fill=%22%233CB7E9%22%3E%3C/path%3E%3C/g%3E%3Cg%20id=%22Group_113%22%20data-name=%22Group%20113%22%20transform=%22translate(0%201.144)%22%3E%3Cpath%20id=%22Path_86%22%20data-name=%22Path%2086%22%20d=%22M871.218-30.519a.9.9,0,0,1-.43-.109l-8.359-4.523a.906.906,0,0,1-.366-1.228.906.906,0,0,1,1.228-.366l8.359,4.523a.906.906,0,0,1,.366,1.228A.906.906,0,0,1,871.218-30.519Z%22%20transform=%22translate(-861.954%2036.855)%22%20fill=%22%233CB7E9%22%3E%3C/path%3E%3C/g%3E%3C/g%3E%3Cg%20id=%22Group_117%22%20data-name=%22Group%20117%22%20transform=%22translate(698.618%20-172.327)%22%3E%3Cg%20id=%22Group_115%22%20data-name=%22Group%20115%22%20transform=%22translate(4.485)%22%3E%3Cpath%20id=%22Path_87%22%20data-name=%22Path%2087%22%20d=%22M772.181-37.943a.9.9,0,0,1-.254-.037.906.906,0,0,1-.616-1.124l.869-2.979-2.979-.869a.906.906,0,0,1-.616-1.124.907.907,0,0,1,1.124-.616l3.849,1.123a.907.907,0,0,1,.616,1.124L773.051-38.6A.907.907,0,0,1,772.181-37.943Z%22%20transform=%22translate(-768.548%2044.728)%22%20fill=%22%233CB7E9%22%3E%3C/path%3E%3C/g%3E%3Cg%20id=%22Group_116%22%20data-name=%22Group%20116%22%20transform=%22translate(0%201.123)%22%3E%3Cpath%20id=%22Path_88%22%20data-name=%22Path%2088%22%20d=%22M737.287-30.291a.906.906,0,0,1-.8-.471.906.906,0,0,1,.359-1.23l8.334-4.569a.907.907,0,0,1,1.23.359.906.906,0,0,1-.359,1.23L737.722-30.4A.9.9,0,0,1,737.287-30.291Z%22%20transform=%22translate(-736.38%2036.673)%22%20fill=%22%233CB7E9%22%3E%3C/path%3E%3C/g%3E%3C/g%3E%3Cg%20id=%22Group_118%22%20data-name=%22Group%20118%22%20transform=%22translate(723.26%20-161.15)%22%3E%3Cpath%20id=%22Path_89%22%20data-name=%22Path%2089%22%20d=%22M923.74,49.674a.9.9,0,0,1-.641-.265l-9.716-9.716a.906.906,0,0,1,1.282-1.282l9.075,9.075,1.43-1.43-9.075-9.075a.906.906,0,0,1,1.282-1.282l9.716,9.716a.907.907,0,0,1,0,1.282l-2.711,2.711A.9.9,0,0,1,923.74,49.674Z%22%20transform=%22translate(-913.118%20-35.435)%22%20fill=%22%233CB7E9%22%3E%3C/path%3E%3C/g%3E%3C/g%3E%3C/svg%3E%20)
%22%20fill=%22%233db8ea%22%3E%3C/path%3E%3C/svg%3E%20)
Technical SEO is a large branch of the broader set of SEO with a focus on those items not always seen to the untrained eye. Website SEO-related items that are under the hood, technical items so to speak. This is a huge area of concern, underlying is and supporting large sections of the vast SEO framework.
What is Technical SEO?

In many ways, technical SEO is the scariest of all the areas of SEO. It quite easily gets the average marketer’s pulse racing, and sweating at the thought of some tedious and complicated issue. However, it’s the SEO foundation, one of the 3 pillars of SEO on which everything else is built. If a website has major technical flaws, then no amount of marketing magic can plug the gap and save your website’s search performance.
Google itself has demonstrated a strong technical culture and has documented the importance of quality technical SEO when ranking your website. Clearly, this is an area every online marketer needs to pay attention to. But what does technical optimisation actually involve?
Why Technical SEO is different
The way you approach Technical SEO is fundamentally different. You need to chunk it down to three main areas of focus to help us think about how to approach technical SEO. The areas of focus being:
- Crawling
- Indexing
- Rendering
Martin Splitt explains crawling, indexing & rendering in this video.

On the surface, these three items may not seem like much, but when you take a closer look, you find that it really is a case of how far down the rabbit hole do you want to go? This approach is focused on how search engine bots crawl, index and render your site, and this usually involves those more technically focused issues within your website.
Crawling, Indexing & Rendering
It’s vital that search engine bots can find your page and crawl it effectively, including your website’s status codes, sitemaps, architecture, robots.txt.
You want to make it as easy as possible for search engine bots to index your web page. But any unwitting methods used could cause your web pages to be non-indexable.
How search engine bots render your webpage is essential if you want to be indexed effectively. Consider how they may be rendered with JavaScript, the DOM elements, and page speed.
As your page renders, it’s important for the content to be understood if you want the best outcome indexing. You need to consider how well you have implemented schema markup, and how accessible your web page is. Sending the right signals with canonical tags and effective pagination is essential
Technical SEO baseline
Technical SEO spends a lot of time obsessing about the need for Google to crawl, index and render your web pages effectively. If this technical SEO baseline is not lived up to, then you will find your efforts pushing up against some boundaries, and you won’t be able to burst through that ceiling for your rankings and desired traffic.
Recommended reading: Getting started with technical SEO
Understanding HTTP Status Codes
Search engine bots use HTTP status codes when crawling to help determine the health of your website. These Hypertext Transfer Protocol (HTTP) status codes are given by a web server in response to a request made by the client or a crawler when you browse the website, or when search engine bots such as Googlebot, crawl the website.
Common HTTP Status Codes
You will want to enhance your technical vocabulary by understanding HTTP status and error codes. Below is a list and an explanation of each of the most common error codes
Common HTTP Status Codes are:
200 (OK) – This is the response you want for our pages to be indexed by Google.
301 (Moved Permanently) – Tells Google our page has moved to a new location.
302 (Found) – Ambiguous, but thought of as a temporary redirect, not permanent.
307 (Temporary) – Temporary redirect, this replaced the 302, is now more precise.
403 (Forbidden) – There is no proper permission to access the requested resource.
404 (Not Found) – The page can’t be found resulting in a broken link.
410 (Gone) – Use this to indicate to bots the page is permanently removed.
500 (Internal Server Error) – An unwanted, unexpected error has occurred.
Further learnings on HTTP status codes
The full list of HTTP status codes is quite long and very involved. Here you can see Google has a Status code resource for everyone to read and reference. It’ll be a great idea to get to know these a little and understand how they work.
HTTPS and SSL for securing your website
Internet security in this stone age is vitally important. Google has made it clear that they take Internet Security very seriously, takes action on unsecured websites.
What is HTTPS
Hypertext Transfer Protocol Secure (HTTPS) is an Internet protocol designed to protect the identity and confidentiality between the computer and the website. Users in this day and age expect privacy and security when using someone’s website.
Why HTTPS is important
There are still many websites that do not have HTTPS and are still using HTTP. We know that Google prefers HTTPS, and our SEO efforts need to ensure we have implemented an SSL certificate correctly.
You need an SSL Certificate
You need to have an SSL certificate if you want to enable HTTPS for your website. Make sure you get your certificate from a trusted provider. Your web hosting company will most likely be able to help you enable your SSL certificate. You can also speak with a web developer to help you implement https on your website.
If you are updating your website from HTTP to HTTPS then this is considered to be a migration. Google will treat this as a site move with URL changes. The migration can affect some of the traffic temporarily. It’s important to treat this as a migration and make sure the necessary redirects are put in place to avoid losing too much traffic.
XML Sitemaps & informing Google about your URLs
An XML sitemap is a file on your website that gives information about the pages, videos, and other files and resources. XML sitemaps help search engines like Google read and understand the files and understand the relationship between all these URLs.
It’s a way to tell Google which pages are important on your website and it’s a way it also helps Google with further information about these URLs.
You can also provide sitemaps with information about more specific types of content such as videos, images and news.
Not every site needs an XML Sitemap
If you’re using a common content management system (CMS) such as WordPress or a platform such a Shopify, you’ve probably already got an XML sitemap provided for you. You may not need to do much in the way of working on your XML sitemap depending on your website nature.
Not every website needs to be overly concerned about having an XML sitemap. For example, if all your pages are properly interlinked and if Google can crawl and discover all those URLs, for smaller sites, you may not ,strictly speaking, need to implement an XML sitemap.
However, since you want to get better results through SEO, it’s highly advised to implement a well-structured XML sitemap on your site.
Get started with XML Sitemaps
The most basic XML sitemap format Specifies that a site map must be limited to 50 megabytes in size and include a maximum of 50000 URLs. If you have more than 50,000 files on your site, you can break your sitemaps into multiples and use a sitemap index file.
A sitemap index file is a list of sitemaps and you can submit the index file to Google, which then tells Google where to find all the other site maps on your website.
Below is an example of what the most basic XML sitemap looks like.

(image credit: Google Search Central)
Recommended reading: Learn more about XML Sitemaps
Robots.txt file – which pages can be crawled?
Robots.txt is a file that tells search engine crawlers which URLs on your website it should access and crawl. It helps Google understand which pages not to crawl so that you don’t get too many crawl requests for URLs on your website.
You can use a robots.txt file to manage crawl requests to your server to avoid too much web server traffic. It’s common practice to block resource files and unimportant images and scripts from being crawled.
Particular attention should be paid to which resource files you are blocking because some of these files may be important for Google to crawl and understand the webpage, particularly during the rendering process. So Google needs to access all relevant files and resources on your website so that they can get an understanding of your site and index it effectively.
It’s a common mistake that people think using robots.txt is a way to keep web pages out of the Google index. Disallowing URLs in your robot.txt file is not a reliable way to do this.
If you want to keep certain pages out of the Google index, you will need to block the indexing of those pages by using a noindex directive, or you may need to password-protect that page.
Below are some basic robots.txt examples.
This first example tells all the crawlers that they can freely crawl the website because of the wildcard * and the Allow.

This second example tells all crawlers not to access any pages on your website due to the wildcard * and the Disallow.

You can tell crawlers not to crawl certain directories.

Specific files to be disallowed can also be specified.

It’s also important to include your XML sitemap in your robots.txt file. This helps Google find and verify it. Include it in one line, like shown below!
![]()
You can use the Studio Hawk Robots.txt tool to test and validate what’s in your robots.txt file.
Meta tags for search appearance and behaviour
Meta tags are an excellent opportunity to tell search engines more information about your website pages. Meta tags are placed within the section of the HTML code of your page. You can use them to explain to Google what our page is all about and what to do with the page that it’s crawling.
The most important meta tags are:
- Page title
- Meta description
- Meta robots
Page title tag
The Page title is not a meta tag but is considered one for convenience sake. It’s actually a title tag placed within the head of the html code.
Here is an example of the Studio Hawk home page title.
![]()
The title is very important for SEO because it tells users and Google the name of your page. If implemented correctly, your title will appear in Google search results as the big blue line of text, see below.

(Note: Google is now also swapping out title tag with the H1 tag in search results.)
It’s often the deciding factor for whether a user clicks your result or someone else’s search result. Your title tag should give users a look into what’s on the content of your page and how it’s relevant to their search query.
You want your titles to be unique and to be brief and descriptive. You also want your title to include your target keyword if it makes sense in a readable way, and it should match the users’ search intent. It’s best practice to keep your titles under 60 characters long.
Meta description tag
The Meta description tag gives a summary of what’s in that page’s content. Use it to place a short and accurate description of what your page is all about.

It’s often used by search engines for the snippets section of the search result as can be seen below.

Meta description tags are an excellent way to give information to the users with a relevant summary of what that page is all about. It’s a bit like having a short pitch that makes the user want to click on your result and go to your page.
It’s good to optimise these meta descriptions to encourage more people to click through from the search results giving you more traffic to your web pages.
It’s important to know that meta descriptions are not a direct ranking factor. Even though Google does sometimes use the meta description for the snippets section of the search result, Google does not use the meta description as a part of its process for rankings.
You’ll want to write unique meta descriptions for every page on your website. These meta descriptions should be an accurate summary of the content on your page. It’s an easy trap to fall into writing generic descriptions across your pages due to a lack of time to write high-quality unique meta descriptions.
Make sure your meta descriptions are not clickbait, but something that’s click-worthy, and matches the users’ search intent. You’ll want to include your keyword in your meta description where it’s reasonable, while making sure it’s easily to read. Best practice is to keep them under 160 characters long.
Meta robots tag
You can use the meta robots tag to tell search engines if they should crawl and index your web pages.
![]()
The above example tells search engine crawlers to crawl and index the content and links on your page. This is a vitally important tool for SEO to control which pages are indexed and which pages are noindexed:
- index – you want bots to index the page.
- noindex – you don’t want bots to index the page.
- follow – crawl the links on your page, and they are endorsed.
- nofollow – don’t crawl links on your page, they are not endorsed.
For example, you could tell search engine crawlers not to follow or index the page by placing this meta robots tag in your HTML code:
![]()
The above example tells Google not to crawl the links and not to index the content on the page.
But it’s important to know that Google treats nofollow as a hint rather than a directive. So even if you’re using nofollow the Googlebot Crawler may still make up its own mind.
If we get our meta robots tags wrong, it can seriously impact how we appear in search results. You can remove pages entirely from Google search. So it’s best practice to edit our robots tags when we want to restrict how Google crawls our page.
301 Redirects
When it comes to redirects, it’s important to have a good strategic approach for using them. You want to present a coherent picture to search engines. For example, if a page has been removed and it’s gone forever, it’s better to use a 301 redirect to transfer the ranking signals to the new destination page.
You’ll only want to use a 307 redirect when the page has been moved temporarily and after some time, you’re going to put that page back.
Redirect chains
A loose redirect strategy can lead to multiple redirects from one page to another, known as redirect chains. This is where crawlers will access the page to be redirected to another page, and then that page also redirects to another. This causes big issues for search engine crawlers and affects your crawl budget and your canonicalization.
Here’s a diagram of a redirect chain:
![]()
Page A redirects to Page B, which also redirects to Page C, and then to Page D, causing multiple hops to take place.
Removing redirect chains can have a very positive effect on your crawl budget. Below we can see the redirects chain removed and simply redirected with a single hop.

Remove old redirects
Clean up any old redirects that have been put in place but are no longer used. In the above example, Page B may no longer be in use, and it may not pass any ranking signals either. There’s a good chance it was put in place and forgotten when the page was moved again.
In this case, it may be better to remove the old redirect from Page B to Page D altogether, and clean up your internal links, so they all point to Page D.
Fix Broken Links to reduce 404 errors
If your internal links are causing 404 errors, the page that’s linked to can’t be found. That is called a broken link. Broken internal links can indicate quality issues and a lack of website maintenance. Broken links to external websites are perhaps not quite as detrimental.
In any event, it’s very annoying for users, so causes a user experience issue. And if it detracts from the user experience, then good bet Google will also take it seriously. Unaddressed broken links can eventually lead to a loss of rankings.
Finding broken links
Using a link checking tool such as Xenu or Screaming Frog will help find broken links and flag them as 404 errors for you. It’s worth scheduling a regular crawl with one of these tools. You can also see 404 errors in your Google Search Console.
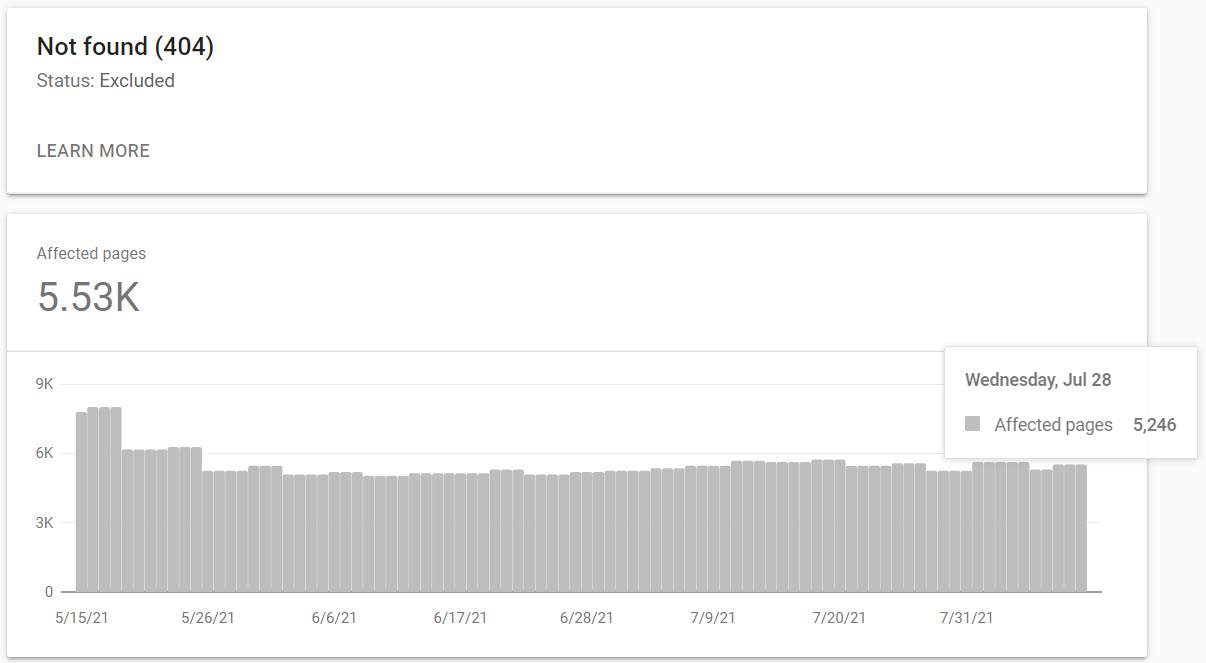
404 errors can become out of control quickly, particularly on large sites.
Fixing broken links
Addressing incoming external broken links is also vital to your SEO efforts. As SEOs, we put a lot of effort into getting a good backlink, and if the page you’re linking to cannot be found, then the benefit of that back link is lost.
It’s worth regularly checking your incoming backlinks and redirecting them to a similar page if the target page is no longer available.
Use a tool like Semrush Backlink Audit to find good quality backlinks pointing to missing pages on your site. Then look for the next most relevant page, and redirect the backlink to that.
Improve the quality and trustworthiness of your site by finding and fixing broken links and reducing the number of 404 errors, and you will see the benefit in your search results.
Core Web Vitals & Speed Optimisation
Slow page speed is one of the oldest and most consistent issues found by SEOs when optimising websites. Sluggish performance can annoy your users, but also it can seriously affect the conversion rate when the user goes to another competitor’s website which may run faster. This causes a bad user experience.
Speed is of particular importance on mobile devices, due to the mindset the user is in while looking up information on their hurried lunch break or the train commuting. Also, mobile internet may not be so reliable in certain areas, which may cause a speed delay to begin with.
So the mobile version of your site needs to be lean and run fast.
Recommended reading: How to speed up your website for mobile
Google measures the speed of your web pages using the Core Web Vitals metrics. These metrics are designed to measure the kinds of elements that will affect user experience. Each of the Core Web Vitals (CWV) addresses a particular measurable area of how users find your web page experience.
Google breaks CWV down into three main areas:
- Loading
- Interactivity
- Visual stability
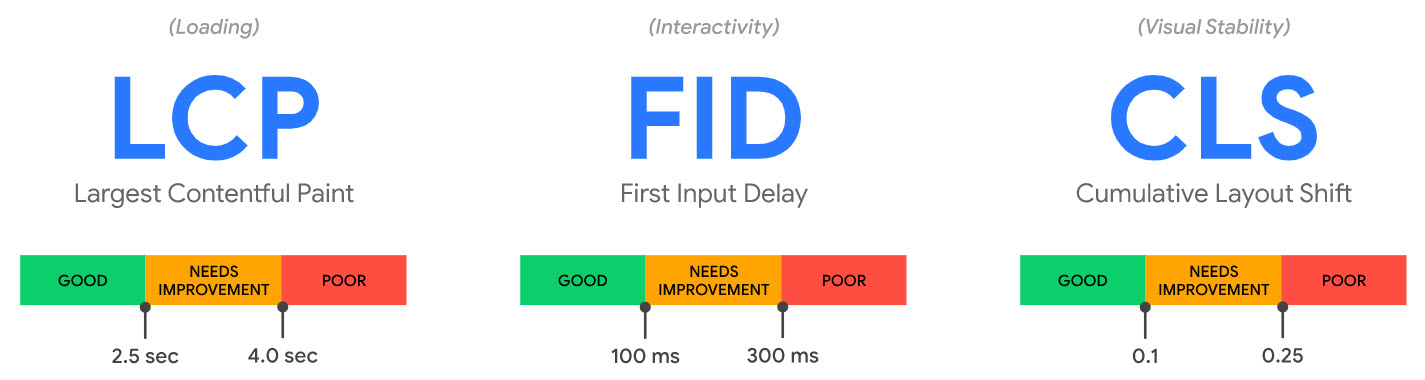
Largest Contentful Paint (LCP) – is used for measuring page loading. The LCP should be within 2.5 seconds for a good user experience.
First Input Delay (FID) – is used for measuring the interactivity as the page is loading. We need a FID of less than 100 milliseconds for a good user experience.
Cumulative Layout Shift (CLS) – is used for measuring the visual stability of your page. We should have a CLS of less than 0.1 for a good user experience.
You can quickly check your CWV for any given page by using the PageSpeed Insights tool, It will give a breakdown of the CWV metrics.
Below is Google.com as measured with the PageSpeed Insights tool:

Google is taking speed very seriously and have included a dedicated report for CWV in Google Search Console which you can take advantage of to improve the speed of your pages.
The report measures URLs and labels them as Poor, Needs improvement, or Good, for either Mobile or Desktop. It also gives example URLs so you can look them up and action them.
Large and bloated images
Bloated images are one of the main causes of slow page load times. It’s recommended to take the time to compress your images before uploading them to your site. Make them only as big as they need to be for the page.
Lazy loading images
Lazy loading is another way to reduce the initial load time of a page. Lazy loading means any images below the fold will only load as the user scrolls down the page. This means that all the images on the page didn’t need to load all at once. They can be loaded only as needed as the user scrolls down the page.
Defer loading of JavaScript
This is a useful way to improve FCP times by only loading hefty scripts when the page has finished loading. Some JavaScript can be quite large and if they are loading at the start of the page load, it will slow down the whole page load.
This is because browsers execute the page code from top to bottom and load the resources as they find them. Deferring loading of JavaScript can speed up FCP load times.
Remove animated elements
Although you may think that your users may appreciate it when that button text slides all the way in as the page loads, think again. The time that it takes for these elements to load affects your CLS score.
Google has said that user experience is hampered by these kinds of elements rather than improved. Consider removing these kinds of animations to improve your CLS.
Recommended reading: Why page speed is important for SEO
Mobile optimization & Cross-Device Compatibility
Back in the early days of the web, trying to make sure your site rendered well and worked properly in the two or three main web browsers was a real challenge. Thanks to the maturation of HTML standards, these cross-browser problems are becoming a thing in the past.
Why cross-device compatibility is important
Today web designers have the difficult task of ensuring the site works well on desktop computers, tablets, smartphones, smart TVs, and any other class of device you can think of. The more cross-device compatible your site is, the easier it will be for a search engine to make sense of it and rank it appropriately.
Test your site on as many real devices as you can, and use online emulations to cover the more esoteric possibilities. While it’s almost impossible to achieve perfect functioning across the whole range of devices, at least make sure that your site degrades gracefully on an incompatible device, rather than collapsing into an unviewable and unrankable mess.
Using Google’s Mobile-Friendly Test
Testing your site regularly with the Google Mobile-Friendly Test is a must. As an absolute baseline, you want your site to be what’s called “Mobile-Friendly”. Google believes the future is mobile-based, with the web being accessed more and more on mobile devices, so they want to cater more for that.
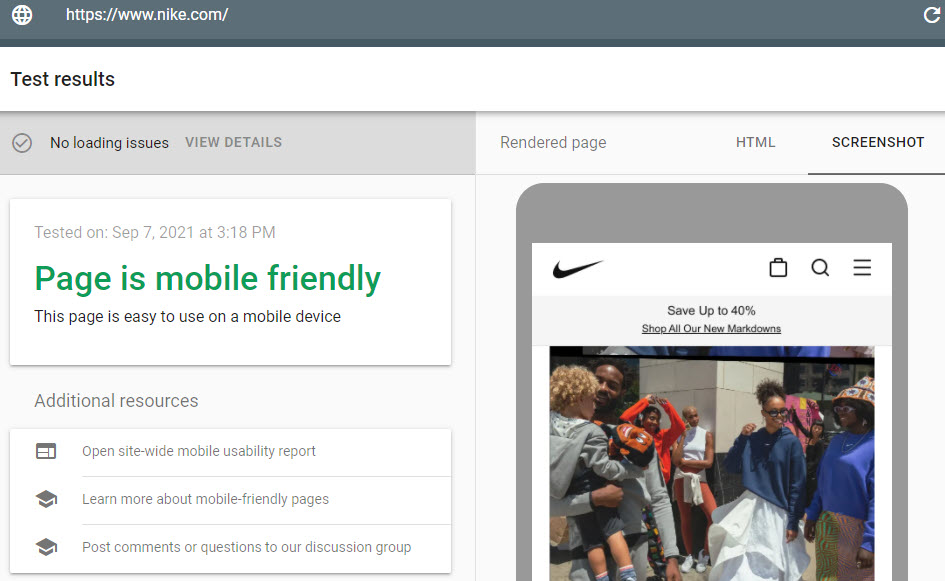
Google made the importance of mobile abundantly clear when they introduced “Mobile-First Indexing”, meaning that the mobile version of your site is crawled and indexed 1st. A strong technical SEO focus on optimising the mobile version of your site will go a long way to getting you better search results.
Canonicalization & Duplicate Content
Avoiding and disambiguating duplicate content is an important part of technical SEO. It can affect your rankings when Google is confused by which piece of content is the original and preferred.
Although copying large chunks of content onto multiple pages is an obvious no-no, it’s also a problem when poorly thought-out or badly implemented URL schemes allow several URLs for the same content.
Google says- “Duplicate content generally refers to substantive blocks of content within or across domains that either completely match other content or are appreciably similar.”
Why duplicate content is a problem
Search engines cannot tell which version of the page is the preferred version, and so the bots cannot choose. Unless otherwise specified, many duplicate versions of the page may be indexed in the search engines. This makes it very difficult for search engines to know which version of the page to rank for a query.
You should have a preferred version of the page and that’s the one we should be linking to both internally and externally. Linking is just one of the signals Google uses to help determine rankings. But if you are also linking to other versions of the same page, you are watering down your signals and confusing the search engines.
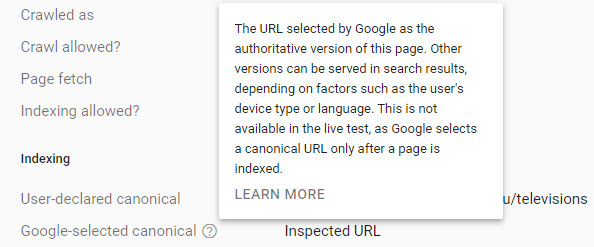
Finding your canonical page
You can use URL Inspection Tool the within Google Search Console to find which page has been chosen as the canonical. At this point, you may be surprised to learn that Google could have chosen a different canonical than the one you desired.
There are varying reasons for this based on signals, such as incoming links to the page, the page’s performance and engagement metrics, and a range of other indexability and ranking considerations.
Finding duplicate pages
You need to find those duplicate pages that have begun multiplying across your site. Particularly if your site has been around for a while, then these pages could be creeping up over time. You need to find these so you can get a clear picture of just how many duplicates you have so you can take action to address them.
You can find duplicates by doing a Screaming frog crawl, then go to the “content” tab and select “Exact Duplicates” from the list selector, as shown below.
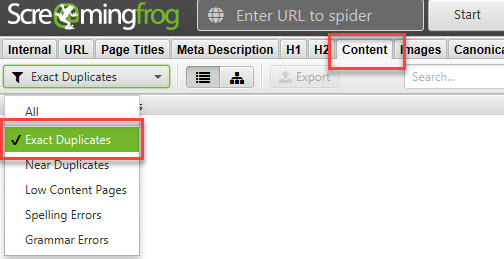
Many of your duplicate pages may not be exact duplicates per se but may be near duplicates. This means a high percentage of the content is duplicated, and therefore the page is still considered duplicate content.
The threshold for near duplicates can be adjusted under Configuration -> Content -> Duplicates. Here you can enable near duplicates and set the threshold. See below.

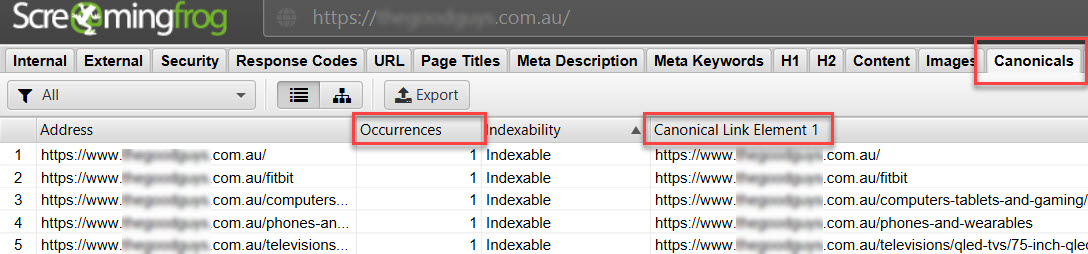
You can also look at a list of all your current canonical links by going to the Canonicals tab and then looking at the Canonical Link elements. Also, pay attention to how many Occurrences of the canonical there are. There should only be one per page, as shown below.
Using the canonical tag
The proper use of the rel=canonical attribute is a great way for handling duplicate content, by telling Google which page we want to be indexed. It’s a good idea to have a self-referencing canonical on every page that you want indexed. For any duplicate pages , you place the canonical, so it references the original and preferred page.
You can also place a cross-domain canonical reference for your content which is duplicated on other websites.
When used correctly, the canonical can help signal to Google that a given page is only a copy and that the rankings should be attributed to the original page. To see what a canonical tag looks like, browse to a page on your site using Chrome, then hit Ctrl+Shift+I to inspect the page with Chrome Dev Tools.
Then search for the word “canonical” this will highlight your rel=canonical in the source code of your page.

If the URL in the rel=canonical points to the preferred page you want indexed, you’re good to go. However, if it’s not pointing to the correct page, you will need to address this issue.
The power of the rel=canonical should not be underestimated, but it’s important to remember that setting the canonical is a signal, not a directive. Meaning, Google may still determine that another page on your site should be the preferred canonical.
In this case, there are very likely other signals overriding your user-declared canonical. It’s really important to update all your internal and external links to the intended canonical page.
301 Redirect unwanted duplicate pages
There comes a time when you realise that maybe many of the duplicated pages are just not serving you in any way. Once you realise this, you may decide to remove them from your website. But now, you may have created another problem – broken links. You removed the page, but internal or external links are still pointing to it, causing a 404 Page Not Found.
In this case, it’s a good idea to place a 301 redirect and point it to the next most relevant page on your site.
Internal Linking for structure and discoverability
Search engine crawlers or spiders navigate the web and discover your content via links. Having a good internal linking strategy gives structure and crawlability and helps your content be found. This also provides structure to help pass link metrics to the most important pages on your site and help improve your rankings.
What are internal links
Simply put, it’s a link from one page on your site to another page on your site. These links help people and search engine crawlers to find and navigate to pages on your site. It’s absolutely essential to have internal links to the page that you want to be found for.
A page without any internal links will be harder for Google to index and rank.
There are two main types of internal links, depending on how your site links are implemented.
Types of internal links
- Navigation links – placed in your header, footer, menus and navigation bars, to help people navigate.
- Contextual links – placed contextually within the page’s main content , these pass link value and relevance.
Navigational links are usually pretty static across the website, and they mostly do point to important pages on your site. However, navigational links can be considered as boilerplate and therefore not offering as much value as we may have thought.
We can be much more strategic with our internal linking using contextual links, which are highly relative if thoughtfully placed from one page to another relevant page on our site.
Below is an example of a contextual link within the content of a page, linking to another related page on the website:

How internal links pass value
Google looks at the number of internal links and their quality to a given page as a signal of importance and value for that page. Since you have complete control over your internal links, you can ensure your most important pages have a good number of quality internal links coming to them as a site owner.
This helps Google understand the relationship between your pages and how your page fits into your overall structure. Google gets an understanding of your site and the important pages by crawling all your contextual links.
Therefore we can help search engines better understand which pages are relevant and more important by placing contextual links.
How links pass value can be ultimately understood by looking at the PageRank algorithm by Google. However, in this article, we will look at how value or equity is passed as it is very similar to PageRank.
It’s an interesting journey if you’re up for a deep dive into how PageRank works on Wikipedia The below diagram demonstrates how equity may be passed.

The link equity passed by contextual links is divided by the total number of links on a page. This means you can overdo it by placing too many contextual links on a page and watering down the value of those links that the equity is divided among.

Usually, the most amount of link equity can be passed by linking to other pages on your site from your home page. This is because the home page usually has the most incoming backlinks from other sites, and we can then distribute that link equity thoughtfully to other pages on your website.
An example of this is powering up a newly published blog post by placing a link to it from the home page of your site. This will take the link equity of all your incoming backlinks and share it out between the links on the home page, including the link you placed to your new blog post.
Internal linking strategy
You’re going to want an internal linking strategy to make sure your most important pages get the most benefit from your internal links. Keeping in mind the reason for our internal links, we should consider these three determining factors for creating internal links:
Factors for determining internal links:
- Relevance between pages
- Relationship between pages
- Value passed between pages
It’s helpful to think of your website as a pyramid structure, with your homepage at the top. The layers underneath will be various categories and sections within your site. Layers further down will be the individual services, product pages, and blog posts etc.
You will not want to create too many layers. Just keep it at 3-4 layers deep maximum for best results.

You will want to focus on how this pyramid structure is weighted with links to your most important content. The more important the content, the higher the ratio of internal contextual links to those pages.
For example, if you’re writing lots of articles about a flagship product, then each of these should contain a contextual link to the definitive page for that product. The idea is to concentrate those links from the most relative pages to the most important page on that topic.
Also, place a link from this page back to the articles to help reinforce the structure, and spread link equity by relevance.
You’re going to want to put a fair effort into this internal linking strategy. Keep at it, making sure all your content is linked strategically, particularly new content which may get published and forgotten about.
Develop your internal linking strategy because it’s one of the most powerful ways to help Google help you get better search results.
Your Technical SEO journey
In essence, technical SEO aims to remove barriers from the search engines’ path, making it as easy as possible for them to understand your site and rank it well. I have always taken a strong focus on Technical SEO when working on client campaigns, which has always yielded terrific results.
Dive into crawling, indexing and rendering to make sure Google sees and ranks your site. Get under the hood with HTTP status codes, and configure your HTTPS and SSL. XML Sitemaps and Robots.txt are absolutely essential, along with Meta tags.
Work on your 301 Redirects, address the broken links, and sort out your Canonicalization. Optimise the Mobile version of your site, make sure it runs fast and passes the Core Web Vitals. Never underestimate the power of a good solid Internal linking structure.
Happily, making your site more technically appealing to Google also makes it more useful for humans – the same efforts will pay you back twice by boosting rankings and increasing conversions.